

Views: 0 Author: Site Editor Publish Time: 2026-01-21 Origin: Site


People ask a simple question. Are Lead Containers leak-proof? The honest answer depends on what “leak” means, plus how you use them day to day.
Most teams use Lead Containers for radiation shielding, storage, transport, or waste handling. Spills still worry them. We get it. A small drip can turn into contamination checks, downtime, and extra reports.
Radiopharmaceutical dose transport between rooms, carts, or buildings.
Nuclear medicine workflows, frequent open-close cycles, gloved hands.
Lab sample storage, short-term holding, crowded bench setups.
Radioactive waste collection, liquids plus absorbents, odor control needs.
Will it stop liquids, not only reduce radiation exposure?
Does the lid seal, or does it only sit snug?
Do we still need secondary containment inside?
What closure style fits our routine, speed, and risk level?
Quick takeaway: many Lead Containers focus on shielding first. True leak control comes from closure design plus inner packaging.
People use “leak” in two ways. One means radiation streaming outside the container. The other means liquid or vapor escaping the cavity. They sound similar. They behave differently.
| Meaning of “leak” | What you notice | What controls it | Common improvement |
|---|---|---|---|
| Radiation streaming | Higher readings near seams or lid edges | Lead thickness, overlap geometry, gap control | Better lid fit, thicker shielding, improved overlap |
| Liquid or vapor escape | Wet absorbent, odor, contamination risk | Gasket, O-ring, threads, lid seating pressure | Seals, locking closures, better inner containment |
Shielding controls exposure risk.
Sealing controls spill risk.
Great shielding does not guarantee great sealing.
So when you see “leak-proof” near Lead Containers, check the context. Some pages mean reduced radiation streaming. Others mean spill prevention during storage or transport.
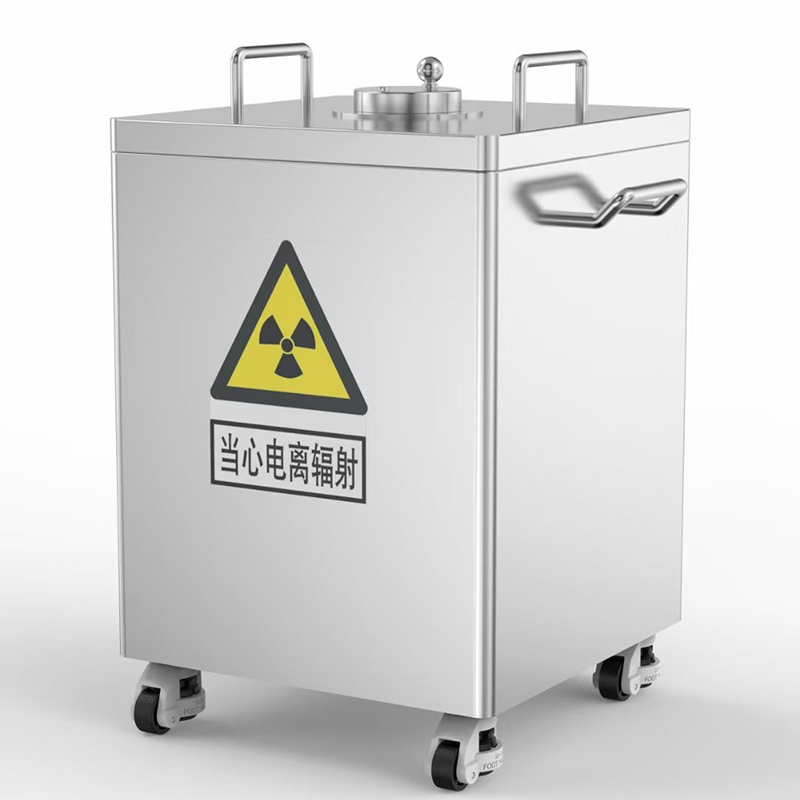
Most Lead Containers share the same core idea. Dense lead reduces gamma and X-ray exposure. A lid gives access to the inner cavity. Sealing depends on the lid interface, not the lead wall.
Lead pigs: compact cavities for vials, fast handling.
Lead-lined containers: lead layer inside a tougher outer shell.
Transport containers: handles, stable bases, closures made for movement.
Waste containers: larger openings, tighter lids, spill control focus.
It reduces direct lead contact during routine handling.
It improves grip and cleanability for daily work.
It protects lead from dents and surface wear.
Liquid rarely passes through lead walls. Leaks almost always start at the lid zone. Threads, flat faces, and tiny gaps decide the outcome.
Simple cross-section idea

[Outer shell]
┌───────────────────────────┐
│         Lid / Cap          │  ← sealing face, gasket zone
│     ┌─────────────────┐    │
│     │   Inner cavity    │   │  ← vial, syringe, sample cup
│     └─────────────────┘    │
│     Lead shielding body     │
└───────────────────────────┘
So “leak-proof Lead Containers” usually means a stronger closure system. Think gasket, O-ring, overlap geometry, plus consistent machining.
Sometimes yes. Sometimes no. Most often, it depends on the model plus your packaging choices.
They use a gasket or O-ring at the lid interface.
They use a positive lock, bolted lid, or repeatable closure pressure.
They target transport or waste handling, not only shielding.
The lid closes metal-to-metal, no sealing element present.
The cap relies on friction fit, not compression sealing.
The inner vial becomes the only liquid barrier.
Many teams treat Lead Containers as shielding plus impact protection. Leak control comes from layers. A sealed vial first. A secondary bag next. Add absorbent for liquids. Then the shield outside.
Lower leak control  ───────────────────────────►  Higher leak control
Simple lid fit → Threaded cap → Gasket / O-ring → Lock + gasket + inner liner
If you move liquids often, aim for the right side. If you store sealed solids, the middle often works. Your SOP decides the correct choice.
Leak resistance comes from small details. Lids, seals, and tolerances matter most. Cleanability matters too. So does repeatable closure feel across many cycles.
Gasket or O-ring: compression sealing at the lid face.
Thread quality: smooth engagement, consistent seating pressure.
Positive lock: reduces loosening during vibration or handling.
Overlap geometry: lowers streaming risk, improves lid stability.
Easy-clean exterior: smooth shell, glove-friendly grip, fewer crevices.
| Closure style | Leak control potential | Best for | Watch-outs |
|---|---|---|---|
| Simple slip lid | Low | Dry solids, quick access | Gap risk, no compression seal |
| Threaded screw cap | Medium | Routine vial handling | Cross-threading, debris on threads |
| Threaded cap plus O-ring | High | Liquids, transport, higher spill concern | O-ring wear, replacement intervals |
| Locking ring plus gasket | High | Waste, longer storage, odor control | Gasket set, closure discipline |
Inspect sealing surfaces. Keep them clean and dry.
Check the gasket. Look for flattening, cracks, or cuts.
Close evenly. Stop once resistance feels consistent.
Run a non-hazard screening test before high-risk use.
Marketing uses “leak-proof” broadly. Regulations talk about containment performance. Facilities add SOP rules too. We follow both. It keeps decisions grounded and auditable.
Containment: keeps contents inside during routine handling and movement.
Leakage test: checks escape of gas or liquid from a package system.
Package: inner vial, absorbent, outer shield, labels, plus instructions.
Many Lead Containers prioritize shielding and physical protection.
Some workflows require verified sealing performance for transport.
Layered containment often becomes the practical solution.
| Use case | Typical focus | What you should verify |
|---|---|---|
| In-room handling | Contamination control, exposure control | Closure integrity, clean surfaces, routine checks |
| On-site transport | SOP-driven containment expectations | Secondary containment, absorbent, stable closure |
| Off-site shipment | Regulated package performance | Documented packaging method, leakage approach |
So yes, Lead Containers help. For shipment, the system matters more than a single part. It protects staff, public, and environment.
You do not need complex tools for an early screen. Start simple. Keep it safe. Use a non-hazard test liquid. Follow your site rules.
Look at the lid face. It should sit flat.
Check threads. No burrs. No grit.
Inspect gasket or O-ring. No cracks. No flattening.
Confirm closure feel. Smooth tightening, consistent resistance.
We simulate leakage risk using water plus dye. It reveals tiny seepage fast. Keep it controlled. No radioactive materials for this screening step.
Line the cavity using clean absorbent paper.
Place a sealed test vial inside, filled using dyed water.
Close the Lead Container as usual, same hand force each run.
Hold it upright for 10 minutes, then tilt 45° for 2 minutes.
Open it. Check absorbent paper for any color.
Pass: absorbent stays dry, no color, lid stays firm.
Borderline: faint damp ring near the lid zone.
Fail: wet absorbent, dye on threads, loosening during tilt.
Mini decision chart

Inspect lid + seal
      |
      v
Seal looks good? ---- no ---> replace seal / retire unit
      |
     yes
      |
      v
Run bench screen
      |
      v
Dry? ---- yes ---> ok for low-risk internal handling
  |
  no
  |
  v
Add secondary containment + upgrade closure design
Choosing gets easier when we start from contents. Liquid behaves differently than dry solids. Volatile solvents add a new risk. We match closure style to risk level, not habit.
What do you store or move?
   |
   +-- Unit-dose vial  -> compact vial pig, fast open-close
   |
   +-- Multi-vial set  -> transport container, stable base, handle
   |
   +-- Liquid waste    -> waste container, gasket + lock preferred
   |
   +-- Long storage    -> lead-lined container, durable shell
| Spec | Why it matters | What to look for |
|---|---|---|
| Closure type | Controls leak path near lid | O-ring, gasket, locking hardware, repeatable seating feel |
| Cavity fit | Reduces rattling and vial damage | Correct vial size, optional inner liner or cup |
| Lead thickness | Controls dose rate outside | Shielding level aligned to isotope energy and activity |
| Exterior finish | Supports cleaning and daily handling | Smooth shell, durable coating, glove-friendly grip |
| Documentation | Helps audits and training | Clear specs, maintenance guidance, packaging recommendations |
For transport-focused options, see Lead Tank for Transporting Radioactive Materials. For waste handling, see Medical Waste Storage Tank. For the broader product family, see Nuclear Medicine.
Good habits reduce risk more than most upgrades. It adds minutes now. It saves hours later.
Use a sealed primary vial or syringe as the first barrier.
Add a secondary bag for liquids or unknown integrity samples.
Include absorbent for liquids, sized for worst-case volume.
Keep it upright during movement. Use a stable tray or cart.
Close it using consistent hand force. Avoid over-torque.
Clean threads often. Dust can ruin a seal.
Replace seals on a schedule. They age quietly.
| Problem | What you notice | What we do |
|---|---|---|
| Seal wear | Lid feels loose or uneven | Replace gasket or O-ring, then retest |
| Thread contamination | Grinding feel during closure | Clean threads, dry, then close again |
| Overfill | Pressure pushes liquid toward lid | Reduce fill volume, add absorbent, secure vial cap |
If you suspect leakage, stop and follow site procedures. Avoid improvisation. It protects people and keeps documentation clean.
Isolate the item in a controlled area.
Notify your RSO, supervisor, or lab lead per SOP.
Use PPE suitable for the material involved.
Contain spread using absorbent, then secure waste per policy.
Was the lid cross-threaded or partially seated?
Did debris sit on the sealing face?
Did the seal flatten or crack from age?
Did impact dent the rim, changing alignment?
Did the inner vial cap loosen during movement?
| Condition | Recommendation | Reason |
|---|---|---|
| Minor seal wear | Replace seal, then retest | Low cost, strong impact on leak control |
| Damaged threads | Retire or service | Threads control closure pressure, hard to fix on-site |
| Dented rim | Retire for sealing use | Misalignment creates unpredictable leak risk |
Some designs resist water entry well. Many focus on shielding, not water sealing. Look for gasket or O-ring designs. Use a secondary bag plus absorbent for liquid movement.
They reduce spill consequences by adding shielding and containment volume. Liquid sealing depends on the closure. If it lacks a seal, rely on vial integrity plus secondary containment.
Only sealing designs help odor control. A gasket improves it. A simple lid fit can allow vapor movement. If vapors matter, seal the inner container and screen the closure.
Start using a basic bench screen using dyed water for liquids. For higher assurance, follow facility qualification methods aligned to your compliance needs.
Seal wear, grit on threads, uneven closure, drops, overfill. It adds up. Inspection plus consistent closure habits prevent most issues.
It depends on cycle count and cleaning approach. High throughput needs more frequent replacement. Track openings or use a calendar interval, then retest after replacement.
Not always. Off-site shipment can require a qualified package system. Lead Containers can be part of it. Documentation and packaging steps still matter.
Many waste-focused designs aim for tighter sealing using gaskets plus locking hardware. Treat it as a system. Use liners, absorbent, plus disciplined closure.
Lead Containers can be leak-proof. Seals and closures decide it. Many units mainly deliver shielding plus physical protection, so layered containment remains the practical approach for liquids.
Need spill protection? Choose gasket or O-ring designs.
Need fast access? Threaded lids help, plus good habits.
Need shipping readiness? Focus on the full package system.


